Thursday, December 23, 2010

Pep Pie!


Anyone out there remember Pep? Like an oversized After-Eight saucer, a tongue-cooling white peppermint "candy"-filled dark chocolate party puck in a crinkly, shiny green wrapper.

My husband Rich's favourite ice cream is peppermint chocolate chip, and I have been pretty exhausted with making cakes lately so when I get a chance to make something else I get quite excited! So for Rich's birthday, I made this Pep pie...

Ice cream pie made out of homemade ice cream, and it was truly simple and magical indeed. Crumbs of the Oreo cookie combine with melted butter and get pressed into a pie pan. Baked for just a few minutes until set, then left to cool. Ice cream is churned and piled into the pie pan, smoothed with an offset spatula and left to set in the freezer. A rich dark cocoa fudge topping is made on the stovetop, cooled, and poured on top of the ice cream pie. Back into the freezer it goes to set, uncovered, for an hour. Then plastic wrap covers it until the time comes to slice in.

Thus, I christened this my Pep Pie. I made the creamy cool peppermint ice cream filling using condensed milk, heavy cream, peppermint extract and a pinch of salt, and I just had to use the teensiest bit of green food colouring to trick the eye into thinking "peppermint". Not that you would have to trick yourself... one bite and the peppermint cools your mouth, a creamy smooth spoonful with flecks of dark chocolate folded into it.

To my honeybun Richie: Happy Birthday!!

{Peppermint Ice Cream Pep Pie}

You will need:
An Oreo or chocolate wafer cookie pie crust
peppermint ice cream

dark cocoa chocolate fudge topping
(recipes below!)

to make the crust:

Combine 1 1/4 cups Oreo or dark wafer cookie crumbs with 1/4 cup melted butter. Press into 9 inch pie pan. Bake at 350 degrees for 6-8 minutes until set. Let cool on wire rack.

to make the ice cream:

1. In a medium sized bowl, whisk to combine 3 cups of heavy cream with 1 can of sweetened condensed milk (300 ml)
2. Whisk in 3 teaspoons or pure peppermint extract and 1 generous pinch of salt. Add a teensy touch of green food colouring if so desired.
3. Power-chill mixture in the freezer for 30 minutes until mixture is ice cold but not frozen.
4. Pour into ice cream maker and mix according to ice cream maker instructions, I churned mine for about 25 minutes or so until thick and creamy.
5. Fold in 1 cup of chopped dark chocolate pieces, or chocolate chips of any size.
6. Scoop ice cream into cooled pie shell, using an offset spatula to smooth it. Put in freezer, uncovered while you make the fudge sauce.

to make the fudge sauce:

On stovetop, combine 1/3 cup of dark or high quality cocoa powder with 2/3 cup sugar, 1/3 cup of heavy cream and 3 tablespoons of butter. Whisk gently to combine. Add 1 teaspoon of pure vanilla extract, whisk until smooth. Pour into bowl to cool. I power-chilled my fudge sauce in the freezer for 20 minutes!

Once fudge sauce is cooled, pour on top of peppermint ice cream layer. It's important that the fudge sauce is cooled otherwise it will melty-melt the ice cream and it won't look very pretty.

Place back in freezer and chill for 1 hour uncovered until fudge sauce is set. Then wrap with plastic wrap and chill until time to serve!!

PS you will have leftover ice cream as the recipe above won't all fit into one pie shell! ^_^

You can serve with fresh whipped cream and chocolate shavings or chocolate chips. I meant to do this but I was also hosting a fondue party at the same time so I never got around to making the whipped cream... :)

Wednesday, October 20, 2010

Leftover Pumpkin Pie Ice Cream!


Hello fellow ice cream crazy people! I went to Crazy Town today with an idea. Last week was Canadian Thanksgiving here in good old Vancouver, BC Canada and to celebrate, I made two pies from scratch: pumpkin pie with a ginger snap crust and maple syrup whipped cream, and classic lemon meringue pie with a fluffy toasted meringue. Side note to all pie makers: high fives all around to you guys. Pies can really take some time! But every moment was enjoyable and I look forward to making more and more pies in my baking future.

Because I tend to be a bit of an experimenter in the kitchen, measurements aren't always my strong suit-- I was combining a few different pumpkin pie recipes to make one pie so therefore I wasn't sure how much pie filling to make to fill my 9 inch ginger snap crust. So I went with doubling the pie filling recipe, figuring more is better... thus, I had leftover pie filling! About 3 cups of it, which I poured into a container and put in the fridge.

I'll make another pie with that later, I said.

But then today, I was struck with an idea: why not cook the filling like you would an ice cream custard, add some sweetened consdensed milk and whole milk, mix it up and throw it in ye olde ice cream machine and see what happens??

What happened was a total experiment, and an example of using up ingredients to make something else... no waste! Hooray! But sometimes crazy recipes come into fruition this way, right? This turned out to be a really smooth, creamy and delicious ice cream with a distinct pumpkin/spice/brown sugar flavour.

So here it is. A recipe for pumpkin pie ice cream! I recommend pairing it with some crunchy thin ginger snaps... either ice cream sandwich style or served on the side!

{Pumpkin Pie Ice Cream}

You will need:

3 cups of 1 recipe pumpkin pie filling (recipe right below. make a pie too!)
1 can sweetened condensed milk (300 ml) 1.5 cups heavy cream

(Pumpkin Pie Filling)

1.5 cups heavy cream
2 eggs, beaten

1 16oz can of pumpkin

1/2 cup brown sugar

1 tsp cinnamon

1 tsp powdered ginger


1. Mix all your pumpkin pie filling ingredients together. Put in a medium saucepan on stove. Cook on stove at medium-high for a few minutes until it thickens, stirring constantly. Remove pot from stovetop, let cool.

2. In a large bowl, pour in sweetened condensed milk. Whisk in heavy cream.

3. Slowly whisk in cooled pumpkin pie filling into milk ingredients. Whisk together to combine.

4. Chill pumpkin pie ice cream mixture until well-chilled, 1 hour in freezer or 3-4 hours in refrigerator!

5. Pour into ice cream maker and watch some pumpkin power churn up before your eyes, 25-30 minutes or until desired ice creaminess.

6.
Scoop out and enjoy with a side of ginger snaps, or scoop between two crisp ginger snaps for a very delightful ice cream sandwich!

Happy Fall everyone! ^_^

Wednesday, September 1, 2010

Toasted Coconut Ice Cream


Coconut question of the minute:

Can toasting coconut and steeping it in milk really make the ice cream difference? Can the darkened, crunchy and fragrant toasted coconut infuse the milk, รก la cereal milk, and churn out the loveliest, coconutty-flavorful creamy spoon of ice cream? These are the questions that keep me up at night. Er, not really.

You may or may not have noticed but lately I've been REALLY into using something other than eggs to creamify my ice creams. Sweetened condensed milk and maple syrup have done tremendous jobs in this department, so I decided to experiment with sweetened condensed milk this time. I combined a few different ice cream recipe ideas: infusing milk with toasted coconut I culled from The Perfect Scoop, and using sweetened condensed milk and coconut I found online from a little bit of Googling. Actually it seems as though many Caribbean coconut ice cream recipes combine these very two ingredients: coconut milk and sweetened condensed milk! So I had faith in this little ice cream experiment.

The result? The loveliest, creamiest, smoothest texture and the most delicious fragrant-toasted-coconutty ice cream I've yet to make.

And here is the recipe for you to try.

{Toasted Coconut Ice Cream}

You will need:

1 1/2 cups heavy cream
1 1/2 cups coconut milk (just about one 14 ounce can)
1 can sweetened condensed milk
3 cups shredded, sweetened coconut (or unsweetened if you prefer!)
pinch of salt
ice cream machine!

1. Preheat oven to 350 degrees. Lay 3 cups of shredded coconut on a parchment paper lined baking sheet. Toast coconut until browned, watching carefully, about 10-12 minutes, stirring it around once to ensure overall toastiness. Remove from oven, let cool.

2. In a medium pot on medium heat, combine heavy cream and coconut milk until warmed and steam is rising, hot enough to steep the toasted coconut.

3. Remove pot from heat and set aside. Add 2 cups of toasted coconut, stir and let steep for 1 hour. Reserve 1 cup of toasted coconut for topping your ice cream later!

4. Come on back to your coconut milk party mixture. Strain mixture into a medium sized bowl, removing soggy toasted coconut.

5. Reheat coconut milk mixture in your medium pot. Slowly add the contents of one can of sweetened condensed milk and a pinch of salt until combined. Once combined, remove from heat, pour into bowl for chilling.

6. Chill mixture for 1 hour in freezer or 3-4 hours in fridge until well-chilled!

7. Pour into ice cream machine and churn it up for 25-30 minutes!

8. Scoop a lovely bunch of it into an ice cream bowl, top with toasted coconut and enjoy!


Note: texture will be quite soft (about the texture of soft serve ice cream). Scoop it into a container and harden it a bit in the freezer first before serving, or enjoy straight away.

Monday, August 23, 2010

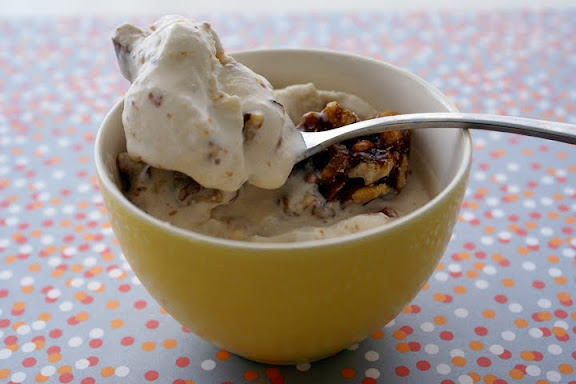
Maple Syrup Ice Cream With Candied Walnuts


I'm a nut for nuts. I'm so happy I'm not allergic to nuts. I think Mr.Peanut is hilarious, I can eat peanut butter with a spoon. And walnuts are the healthy brainfood nut. I also love maple syrup. I've always loved maple flavoured things. Pour it into the little squares of a crisp homemade waffle that's covered in summer berries and plain Greek yogurt and I'm the happiest person on planet Earth.

Back to ice cream: I've decided to start a new project: Ice Cream Love. Makin' my favourite peoples' favourite ice cream flavours! I decided to start with my dear pal Amber, who is nuts for maple walnut ice cream. Whenever I meet someone I like, I can't help but ask them what their favourite food is. I feel like it can help define my relationship to that person, or how well I know them. For instance, I know my husband's favourite ice cream is mint chocolate chip, and he likes anything chocolate hazelnut, and he dislikes very much mushrooms, tomatoes and mustard (three things I love!). Amber's favourite ice cream is maple walnut. My friend Toni loves the combination of chocolate orange just as much as my friend Heather despises it.

Me, I try to like or at least attempt to like all flavours, or, rather, understand why other people like them. I like most things actually. One flavour I think that is super grody to the max though is black licorice. Even so, I will still occasionally try it (the allure of the shiny black salted licorice studded with tiny candies) to make sure I still don't like it. Who knows? Maybe my palette suddenly has changed and I've become a black licorice maniac!

My favourite flavours actually shift fairly often. I love lemon and citrus flavoured things, but I also love a beautiful piece of chocolate. I've always loved caramel in any way shape or form -- poured as a thick sweet syrup on top of ice cream, or eaten in individually wrapped squares in between bites of a granny smith apple. Maple syrup of course, and green tea flavour too, both thumbs up in my book. All these flavours are pretty varying and no rhyme or reason! Such is the strangeness of humanity!

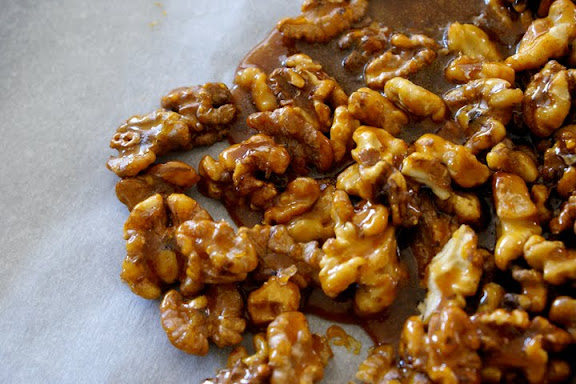
Okay. So onto the recipe. I figured those walnuts had to have something goin' on besides just being thrown in all plainsies style. Pralined? Candied? Sugared? I flipped through The Perfect Scoop and saw a recipe for "Crouquant." Essentially, nut brittle. So I decided to make that! (Only after I made the croquant did I look at a few recipes for maple walnut ice cream and it called for walnuts that had been bathed, per se, in maple syrup at a high temperature, which I will try next time.)

{Maple Syrup Ice Cream With Candied Walnuts}

You will need:


1 1/2 cups walnuts
1 cup sugar
2 cups heavy cream
1 cup whole milk (10% milk fat)

3/4 cup maple syrup
1 teaspooon pure vanilla extract

pinch of salt

1. Preheat oven to 350 degrees. On baking sheet, lay a piece of parchment paper and sprinkle walnuts evenly. Toast walnuts in oven, 6-8 minutes, watching carefully so they don't burn.
2. Remove walnuts, let cool.
3. Place 1 cup of sugar in a heavy bottomed pan. Heat on medium high until golden, beginning to bubble and liquefying. Stir gently to ensure all sugar melts and liquifies!
5. Once liquified, add in toasted walnuts into melted sugar and coat walnuts completely. Mix 'er up. Pour mixture back onto same piece of parchment paper, spread out with spatula and let cool.
6. Once cool, place in food processor and pulse until pieces become smaller, or you can place brittle in a ziploc bag and beat it with a rolling pin...
7. In medium sized pot, heat 1 cup of heavy cream and maple syrup on low until combined. Add the rest of the heavy cream, milk, vanilla and salt and mix until combined.
8. Cover and chill mixture, 1 hour in freezer or 3-4 hours in fridge.
9. Pour into ice cream maker and churn it up according to ice cream maker's instructions. I churned it for 25 minutes. At the last minute, pour in candied walnut pieces and churn for 30 seconds or so until combined.
10. Scoop out and enjoy!

PS-- there are no eggs in this recipe -- but the sugar content from the maple syrup ensures a creamy dreamy delight! No jacket required! (er, no eggs required)...

Sunday, August 8, 2010

Vietnamese Iced Coffee Ice Cream

Yep.

I am a coffee ice cream maniac. I think it all started with my mom's famous ice cream mud pie. My mom has made this since we were kids, and it's the one dessert all of my cousins and my sisters clamour for at Christmastime - even when there's a buffet of rich cakes and pastries and candies - it's the mud pie that gets the attention, our forks and spoons ready to tuck into the dark chocolate crust, creamy coffee ice cream middle and chocolate fudge topping.

Our family is also a mega huge fan of the Cambodian/Vietnamese restaurant here in Vancouver called Phomn Penh, or PP as we call it (if you're not from Vancouver and happen to be visiting, it is an essential food stop!). We've been going there for well over 20-odd years (probably more) and it is here where I got my first initial taste of Vietnamese iced coffee.

A little silver thingie went on top of a glass cup with some sweet creamy stuff on the bottom. Dark brown hot stuff drip-drip-dripped out the bottom, splashing onto the creamy stuff. Once it finished dripping, everything got all mixed together with ice and it was like a liquid power dessert that zinged like a coffee rocket through your veins upon first sip.

On a recent trip to T&T Supermarket with my dad, I finally bought my own "silver thingie" -- in fact, a Vietnamese coffee press. Slowly over a crazy busy week I procured all of my ingredients to make the iced coffee: sweetened condensed milk, and today French dark roast medium-coarse ground coffee! (I bought the beans at a local coffee shop and had them ground). And now... I am so buzzed on this strong coffee. Here is a great tutorial on how to make it. After I made a glass of iced coffee for myself, it was time to move on to the main project: Vietnamese Iced Coffee Ice Cream.

This is the easiest ice cream ever and it tastes crazy-delicious creamy. It maintains an excellent texture straight out of the freezer, no setting out at room temp to warm up a bit! Next time I am going to try playing around with the amount of sweetened condensed milk as I like my ice creams not-too-sweet, but I wonder if it would mess with the perfect consistency, as there are no eggs in this recipe, thus the condensed milk gives it its thick creaminess...

{Vietnamese Iced Coffee Ice Cream}


adapted from David Leibovitz's recipe in the very excellent ice cream book
"The Perfect Scoop".


You will need:


1 can of sweetened condensed milk
1 1/2 cups of French dark roast coffee, brewed strong!

1/2 cup heavy cream
a pinch of the dark roast coffee


1. Brew a very strong batch of espresso using French dark roast coffee.
2. Place sweetened condensed milk in medium bowl.
3. Whisk brewed coffee, heavy cream, pinch of dark roast coffee and sweetened condensed milk all together until combined.
4. Cover and set in refrigerator until well chilled, 3-4 hours. Or try power-chilling it in the freezer but watch carefully!
5. Pour into ice cream maker and churn it up according to maker's instructions. I churned it up for about 25 minutes.

Enjoy this simple and delicious recipe! And maybe use the buzz you get from it to power-clean your house or write a novel!

xo

Tuesday, July 27, 2010

Local Blueberries Ice Cream!


Summer breeze... makes me feel fine... blowing through the jasmine of my minddddd... Ok. I had no idea that was the next line in the song. I had to google it. Man I've had a terrific summer so far. My baking premises got a beautiful kitchen makeover, I went to 5 lovely weddings, including an incredible one in the Bavarian countryside in Germany, traveling with two great friends. Now I'm back and makin' some ice cream on a day off. Not too shabby, I must say! I am a lucky gal!

Anyhoo... blueberries!! So many bright blue delightful little berries in our province of British Columbia right now! You can u-pick them, or people sell them on the side of the road in boxes along with fresh cherries or ears of sweet local corn, and the grocery stores are chock full of them... !

I dunno why but I always think blueberry ice cream or blueberry yogurt tastes like blueberry cheesecake. Perhaps that's why blueberry cheesecake is such a popular combination. This ice cream is no different -- mental blueberry mindgames?

{Blueberry Ice Cream}

You will need:

6 cups fresh blueberries (why not go local if you can!) to make 1.5 cups of puree.
1 tablespoon of freshly squeezed lemon juice
food processor or blender
3/4 cup white granulated sugar

1.5 cups half and half cream
1.5 cups heavy cream

3 egg yolks
fine mesh strainer, and ice cream machine!


1. You will need to make a blueberry puree. Blend the 6 cups of blueberries in the food processor or blender! Using a strainer on top of a bowl, pour blended blueberry mixture into the strainer and, well, strain the mixture using a spatula to push the puree through. Whisk in the lemon juice to prevent browning. Set aside.

2. In a medium saucepan on low heat, combine the half and half cream (10% milk fat) with the sugar.

3. In a medium bowl, whisk egg yolks. In another bowl, pour in heavy cream and add a fine mesh strainer to the top.

4. Slowly, while whisking, pour sugar milk into egg yolks and whisk it all together. Pour back into saucepan and turn up the heat - medium to high heat. Stir constantly until the mixture thickens and coats the back of a spoon. Watch carefully about 3-5 minutes!

6. Remove custard mixture from stove.

7. In the bowl with the heavy cream, slowly pour in the hot custard mixture through the strainer into the heavy cream, mix until combined.

7. Slowly pour in the strained blueberry puree (there should be 1.5 cups!) and

8. Whisk until combined.

9. Cover bowl with plastic wrap, place in freezer for 1 hour roughtly until chilled, or 2-3 hours in refrigerator.

10. Pour into ice cream maker and make according to machine's instructions! (20 minutes or so until thickened!)

11. Enjoy your blueberry ice cream!

Wednesday, June 16, 2010

Raspberry (& Strawberry) Beret: Macaron Ice Cream Sandwiches

The kind you find in a second hand store! Man, who doesn't love Prince? Prince is a serious genius. He lives in a purple mansion, for goodness sake. And he wrote Nothing Compares 2 U, which is one of the best songs perhaps ever.

Anyhoo, check out these nutty (ahem) little French almond macaron raspberry strawberry ice cream sandwiches I made! I followed the handy dandy Martha Stewart Baking Handbook version of these macaron and I think they turned out pretty good. Crunchy crispy chewy, and sandwiched in between is a homemade raspberry/strawberry ice cream.

I got the idea for the swirly-piped macaron ice cream sandwich from two places:

One, Jeni's Splendid Ice Creams, which exists very far away from Vancouver BC Canada where I live, in the state of Ohio, USA. Of course I've only ever seen pictures of her ice creams but she is one of my ice cream heroes. Two, I recently went on a fun trip to Los Angeles... you can read about my food adventures HERE... and had the most delightful macaron ice cream sandwich!! So... of course I had to try making some for myself!

These turned out lovely -- great texture and crunchy chewiness of the macaron, and the ice cream in the middle produced a really lovely double berry flavour! I was worried the strawberries might get overpowered by the raspberries but when I tasted the ice cream, I got strawberry first then raspberry... like a Willy Wonka meal-in-a-gumball! :)


Raspberry Strawberry Macaron
Ice Cream Sandwiches


Organic strawberries!

Piped out macaron discs, baked!

Do you know this lady, this crazy lady named Martha?

Crispy on the outside, chewy on the inside. The French almond macaron.

You're doing a few things at once here: makin' ice cream and makin' macaron! And you're doin' it all with a Chinese soup spoon!

But it's worth it, all your hard work! Macaron ice cream burger!!

Crunch and munch. The photographer is also the food tester, as well as the food-maker.

Pretty in (slightly coral peachy) pink!

Mini ice cream macaron sandwich.


Okay, enough photo harassment. Here's the recipe! Enjoy, let me know how it goes!! Excited to try many many combinations of these in the future too... :)

///////////////////////////////////////////////////////

{Raspberry Strawberry Ice Cream Macaron Sandwiches}

You will need:

1 recipe for French almond macaron, found HERE
1.5 cups strawberries, sliced (I used organic strawberries)
teensy bit of lemon zest
wedge of lemon

1/2 cup raspberry jam
(you could also use real raspberries here!)
1/2 cup white granulated sugar

1.5 cups half and half cream
1.5 cups heavy cream

3 egg yolks
fine mesh strainer, and ice cream machine!


1. In a medium saucepan on low heat, combine the strawberries, jam, lemon juice from wedge of lemon and zest. Stir until bubbling. Remove from heat.

2.In a medium bowl, whisk egg yolks. In another bowl, pour in heavy cream.

3. In a medium saucepan on low heat, combine half & half with the sugar and stir until sugar is melted and combined.

4. Slowly, while whisking, pour sugar milk into egg yolks and whisk it all together. Pour back into saucepan and turn up the heat - medium to high heat. Stir constantly until the mixture thickens and coats the back of a spoon. Watch carefully about 3-5 minutes!

5. Remove custard mixture from stove.

6. In the bowl with the heavy cream, slowly whisk in the hot custard mixture until combined.

7. Place strainer on top of same bowl. Pour in strawberry/raspberry jam mixture, reserving the strawberries in the strainer to be used later!

8. Whisk until combined.

9. Cover bowl with plastic wrap, place in freezer for 30 minutes until chilled, or 2-3 hours in refrigerator.

10. Pour into ice cream maker and make according to machine's instructions! (20 minutes or so!)

11. Fold in the strawberries left from straining! Freeze for 20 minutes before assembling macaron ice cream sandwiches to firm up the ice cream!

12. Scoop some ice cream into the center of one macaron. Top with another macaron of the same size. Squish down a little, and enjoy!! Can be kept in the freezer in an airtight container for up to 1 week.